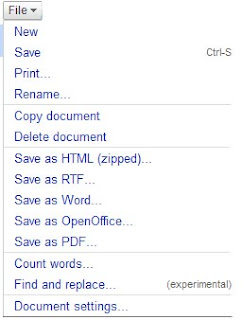
Above, you see the left side of the Google Docs screen. The top black text (here it says "Log into your Gmail account an...") is the title of your document. If you save without changing the title, it will take the first text in your document and make it the title. Until you save, the text will simply say "Untitled". Click once on that text to change the title to whatever you would like.
Below the title is the menu bar. It begins with the "File" button.
 You can create a new document from this menu, as well as save the document you are working on, print the document you are working on or rename it. Notice the "Ctrl-S" beside the "Save" command. This is a standard word processing keyboard shortcut to save a document and it works in Google Docs. Many keyboard shortcuts that you may use in offline word processors won't work, though, so you may want to check the right side of the menus to see what is available.
Below the file commands are two other commands - copy and delete the document. These do just what they say - make a copy of the document as a separate file in your Google Docs application and delete the document from Google Docs altogether.
The next part of the menu allows you to save the document in several different formats. Each of these formats was defined in the first lesson, so please refer back there if you are unsure of what a particular format acronym is. Most offline word processors don't have the ability to save their documents in such a wide range of formats!
Next is the "count words" feature. This is a standard feature on offline word processors as well. It allows you to keep track of the number of words in your document, a common need for students and authors who need to produce documents of a particular length. Find and Replace is also there, but it is still under development, so it may or may not work as expected. Remember that Google Docs is in Beta (still in development) and some things may not work as expected. Make use of those saving options and save your important documents offline frequently!
Finally, the document settings option gives you a way to change the "standard" look of your document. It defines the default font, font size and line spacing for all of your new documents. You can, of course, change these as needed for each individual document, but this is the way to make global changes to all new documents you create if you really hate the font, font size or line spacing that Google Docs makes as the default.

The next part of the interface is on the right side of your screen. This provides you, from right to left and top to bottom, with the user name/email address you are logged in with, links to the list of documents you have in your "Docs Home", a link to get help and a link to sign out of the application. The buttons below those links offer you easy ways to save the document, save it and close it (all in one button push) and close it without saving it (Discard Changes). Below that are links to preview the document, print the document, email the document or share it.
Collaborate offers you the chance to work with someone else on a document. You can enter the email address of the person you want to work with (at the moment, only Gmail addresses seem to work properly) and give them collaboration rights to the document. This means that you both can edit the document without having to email it back and forth or worry about which version you are working on - you both have the most recent version all the time! We'll get more into Collaboration later.
Publish allows you to give that document a unique address on the web (it's very own URL) and give that address out to anyone who may want to read your document. This does not give out editing rights - just reading!
The next lesson will go into the tool bar and the various things you can do with it. Until then, your assignment is to read the linked articles below to get an overview of Google Docs.
Reading:
No comments:
Post a Comment