Tuesday, March 27, 2007

Lesson 2 - Word Processing Basics - Interface part 1

Google Docs' Interface

Above, you see the left side of the Google Docs screen. The top black text (here it says "Log into your Gmail account an...") is the title of your document. If you save without changing the title, it will take the first text in your document and make it the title. Until you save, the text will simply say "Untitled". Click once on that text to change the title to whatever you would like.
Below the title is the menu bar. It begins with the "File" button.
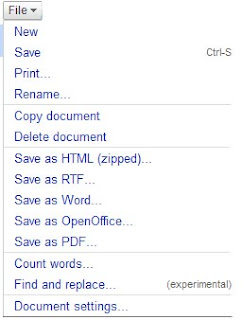
You can create a new document from this menu, as well as save the document you are working on, print the document you are working on or rename it. Notice the "Ctrl-S" beside the "Save" command. This is a standard word processing keyboard shortcut to save a document and it works in Google Docs. Many keyboard shortcuts that you may use in offline word processors won't work, though, so you may want to check the right side of the menus to see what is available.
Below the file commands are two other commands - copy and delete the document. These do just what they say - make a copy of the document as a separate file in your Google Docs application and delete the document from Google Docs altogether.
The next part of the menu allows you to save the document in several different formats. Each of these formats was defined in the first lesson, so please refer back there if you are unsure of what a particular format acronym is. Most offline word processors don't have the ability to save their documents in such a wide range of formats!
Next is the "count words" feature. This is a standard feature on offline word processors as well. It allows you to keep track of the number of words in your document, a common need for students and authors who need to produce documents of a particular length. Find and Replace is also there, but it is still under development, so it may or may not work as expected. Remember that Google Docs is in Beta (still in development) and some things may not work as expected. Make use of those saving options and save your important documents offline frequently!
Finally, the document settings option gives you a way to change the "standard" look of your document. It defines the default font, font size and line spacing for all of your new documents. You can, of course, change these as needed for each individual document, but this is the way to make global changes to all new documents you create if you really hate the font, font size or line spacing that Google Docs makes as the default.

The next part of the interface is on the right side of your screen. This provides you, from right to left and top to bottom, with the user name/email address you are logged in with, links to the list of documents you have in your "Docs Home", a link to get help and a link to sign out of the application. The buttons below those links offer you easy ways to save the document, save it and close it (all in one button push) and close it without saving it (Discard Changes). Below that are links to preview the document, print the document, email the document or share it.
Collaborate offers you the chance to work with someone else on a document. You can enter the email address of the person you want to work with (at the moment, only Gmail addresses seem to work properly) and give them collaboration rights to the document. This means that you both can edit the document without having to email it back and forth or worry about which version you are working on - you both have the most recent version all the time! We'll get more into Collaboration later.
Publish allows you to give that document a unique address on the web (it's very own URL) and give that address out to anyone who may want to read your document. This does not give out editing rights - just reading!
The next lesson will go into the tool bar and the various things you can do with it. Until then, your assignment is to read the linked articles below to get an overview of Google Docs.

Reading:

Wednesday, March 14, 2007

Circulation - The Millennium Client

You can interact with your Millennium application through its main window.

The appearance of the main window may differ depending upon which mode you are in, but the basic components of the window remain the same. For example, the Millennium Cataloging window has the following components (as displayed in the Catalog window example below):

Brief record display
The brief record display, which appears in the top portion of the main window, contains bibliographic record information for the current record. Millennium displays the record number in the brief record display if the Show record number in brief record display option is checked in the Setup tab of the Login Manager.
Close button
Ends the Millennium session.
Control menu box
The box with the Millennium logo in the upper left corner of the main window. The control menu contains options to restore, move, size, minimize, maximize, and close the window.
Current mode
The name of the current Millennium mode displays below the menu bar.
Maximize button
Enlarges the main window so that it fills the entire desktop. After maximizing the window, this button is replaced by the Restore button, which returns the window to its previous size.
Menu bar
Lists the available menus.
Minimize button
Reduces the main window to an icon.
Navigation bar
The vertical strip of tools that displays along the left side of the main window. The tools in the navigation bar allow you to change the current mode.
Range panel
Displays above the brief record display in some modes (e.g., Claim and Rapid Receive modes in Millennium Acquisitions). The range panel allows you to search a range, a review file, or a database index for specific records.
Restore button
See Maximize button.
Status bar
The last line of the main window. The status bar contains supplementary information about the data displayed in the window. The status bar is divided into three zones.

Zone 1 (the left section of the status bar)
Contains information such as the record number of the displayed record, or whether a limit is applied to searches.
Zone 2 (the middle section of the status bar)
Contains informational messages about the displayed record such as Not checked out.
Zone 3 (the right section of the status bar)
Contains information such as the number of records attached to the displayed record or the number of titles and entries retrieved in a search. In some windows, Zone 3 specifies whether you are in edit or view-only mode.
If the content of a zone has multiple lines of text, or if a zone is not wide enough to display its entire contents, an arrow will appear at the right end of the zone. Click anywhere within the zone containing the arrow to display its entire contents.
Tabs
Separate screens that display in the bottom half of the main window. Tabs contain a variety of information (e.g., the holds attached to bibliographic record or the items a patron has checked out). You can display a different tab by clicking on the tab's name. (Keyboard users can use Ctrl T to move forward through the tabs, or Ctrl Shift T to move backward through the tabs.)
Title bar
Displays the window title, and determines whether the window is active or inactive. The title bar of the active window is usually a different color than other title bars. The active window (or dialog) is the one in which you are working.
Toolbar icons
The Toolbar Icons display the actions you can perform in the current mode or with the current record.
Window title
The title of the main window. The window title usually includes the name of your Millennium Application (e.g., Millennium Cataloging), the name of your library, and the number of the record you are currently viewing. The Window Title contains the same name that displays in the status line of character-based terminals and in the title bar of the Web OPAC; this name is set by Innovative at the library's request.

Circulation

Introduction

Understanding the basic components of the Millennium circulation environment and how each function works is key to efficiently using Millennium Circulation. Because there are often multiple ways of performing different tasks, this tutorial will introduce you to the various methods, and you will be able to decide which method is the most comfortable or most efficient for you or your staff. This tutorial starts with creating a patron record and then follows the steps used for most common circulation desk functions in an order in which you might normally encounter them. You'll walk through step-by-step instructions, examples, tips, and annotated illustrations of the Millennium Circulation environment. When you complete this tutorial, you will know and understand:
  • The basic components of the Millennium patron record and how to create and edit a patron record
  • How to check out and check in item records
  • Different ways to search, display, create and modify a hold
  • How to charge money, collect money and adjust fines

Tuesday, March 13, 2007

Searching The OPAC - Indexes

Indexes

Each bibliographic record is indexed as it is added to the database so that it can be retrieved by a variety of access points during a search. The standard INNOPAC indexes are illustrated in this section. However, a particular organization's indexing may vary from this standard.

Authority records are indexed in the same indexes as bibliographic records. Searching the author index, for example, searches both bibliographic and authority records.

The standard indexes available for bibliographic and item records include the following:

  • Record number index -- the index of the unique, sequential number which is assigned automatically to each new INNOPAC record when it is created.

  • Word index or indexes (also called "keyword" index) -- includes words from title fields and subfields, series, corporate and conference authors, and contents notes (optional). This index is available as part of the OPAC module.

  • Call number indexes -- there can be separate call number indexes for each type of call number the library uses.

  • Barcode number index -- the index of the unique number which the library assigns to each Item record; used in the Circulation module.

  • Other bibliographic indexes -- the library may include up to seven additional indexes. Most libraries include:

  • Author (see Heading Indexes)

  • Title -- usually includes series titles (see Heading Indexes)

  • Subject (see Heading Indexes)

  • ISN/other numbers (see Number Indexes)

  • Bibliographic utility number, e.g., OCLC/RLIN number (see Number Indexes)

  • Government documents number (when not used as a call number) (see Number Indexes)

  • An additional optional index defined by the library

INNOPAC indexing capabilities are quite sophisticated. Each index may include many MARC fields and subfields; in addition, different subfields from the same MARC field may be used in different indexes. For example, a record containing the field:

700 |aJames, Henry |tPortrait of a lady

could be retrieved by an author search on "james, henry", a title search on "portrait of a lady", or a keyword search on "portrait", "lady", "portrait lady" or "lady portrait".

Word Index (also called "keyword" index)

The Word index consists of an index of individual words from title fields and subfields, series, corporate and conference authors, and contents notes (optional).

When keyword indexing words which have attached contracted articles, such as "l'enfant," INNOPAC will remove both the initial character and the apostrophe. Thus, an INNOPAC user can search the Word index for "enfant" and successfully retrieve a record which contains "l'enfant" in a keyword indexed field.

Call Number Indexing

During record loading, INNOPAC chooses a single call number from each record (from among all the call numbers in the record) and stores it in the INNOPAC call number field. The library may specify which fields INNOPAC should check, and the order in which it should check them, to extract the value to use. For example, an OCLC library may want the call number selected from the 099, 090, or 050 fields; an RLIN library may want it selected from the 950 or 090 fields. INNOPAC offers the flexibility of extracting call numbers from different fields for different library collections, based on the library holding symbol.

If your library has acquired the Advanced System Access & Administration feature, you can edit the Holding Symbol file. See Holding Symbol for more information.

The resulting call number field may be indexed using:

  • a character-by-character indexing scheme,

  • LC classification logic,

  • Dewey classification logic,

  • SUDOCS logic, or

  • NLM logic.

The LC classification logic allows INNOPAC to keep a call number index for LC call numbers in true shelflist order with Cutter numbers always in a specified position. If your library always uses LC call numbers, you should select the LC classification logic. Dewey, SUDOCS, and NLM logic order the call number index based on the intricacies of those classification schemes.

A library which uses call numbers from different classification schemes, may choose to have multiple call number indexes. In such a case, when a call number is entered in a record, INNOPAC determines which indexing scheme to use based on the MARC tag of the call number field.

Concatenated Call Numbers

If your library has acquired the concatenated call numbers feature, the bibliographic call numbers you specify are concatenated with author and title information. This allows you to generate meaningful inventory reports on the records in your system that begin with general call number information (e.g. MYSTERY, FIC, or YA). See Inventory Control for information on the Inventory Control function.

With concatenated call numbers, eight characters from the author field (not counting spaces or punctuation) and six characters from the title field (not counting spaces, punctuation, or initial articles) are appended to the call number and are indexed in the call number index.

For example, a bibliographic record that contains the data

Call number:

FIC AAR

Author:

Aaron, Chester

Title:

An American Ghost

will be indexed in the call number index as fic aar aaronche americ. With the author and title information included in the call number, the items attached to this bibliographic record will appear in the correct shelving sequence in an inventory.

Heading Indexes

The heading indexes - Author, Subject, and Title - are "phrase" indexes (each index entry consists of an entire heading, not individual words). When searching one of these indexes, the words used in the search statement must be entered in the order in which they appear in the entry in the index. For instance, in the example above, a title search for "lady portrait" would not retrieve the record.

NOTE

Initial articles in titles (as defined in MARC 21 records by the value of the second indicator in the 245 field) are not indexed in the title index. Although punctuation marks are usually not included in the title and subject indexes, the library may choose to include certain ones, such as the '#' character which might appear in titles to indicate the musical "sharp" (e.g., Quartet in C# Minor) or the '+' character which might appear in the title or subject entry for a book on the topic of C++ programming.

The recommended fields and subfields to be included in the standard heading indexes are:

Standard Author Index

MARC Tag

Indicator

Subfields

100

all

abcdq

110

all

abcd

111

all

acdegq

400

2nd ind. = 0

abcd

410

2nd ind. = 0

abcde

411

2nd ind. = 0

acdegq

700

all

abcdq

710

all

abcde

711

all

acdegq

800

all

abcdeq

810

all

abcde

811

all

acdegq

Standard Subject Index

MARC Tag

2nd Indicator

Subfields

600

0 and blank

all

610

0 and blank

all

630

0 and blank

all

650

0 and blank

all

651

0 and blank

all

690

0 and blank

all

691

0 and blank

all

Standard Title Index

MARC Tag

Indicator

Subfields

100

all

fglnoprstv

110

all

fkloprstv

111

all

fklpstv

130

all

all but h

210

all

all

211

all

all

212

all

all

214

all

all

240

all

all but h

245

all

all but h, c

246

all

all but h

247

all

all but h

400

2nd ind. = 0

tpv

410

2nd ind. = 0

tpv

411

2nd ind. = 0

tpv

440

all

all but x

700

all

fglmnoprstv

710

all

fklmoprstv

711

all

fklpstv

730

all

all but h, x

740

all

all but h, x

800

all

fglmnoprstv

810

all

fklmoprstv

811

all

fklpstv

830

all but h

all


Number Indexes

Standard ISBN/ISSN Index

MARC Tag

Indicator

Subfields

020

all

a

022

all

a

028

all

all

NOTE

Libraries can choose to index ISBN and ISSN without punctuation, e.g., the ISSN 0148-8759 would be indexed as 01488759 and could be retrieved by searching for "01488759" or "0148-8579" or "0148 8759".

Standard SUDOCS Index

MARC Tag

Indicator

Subfields

086

all

a

Standard OCLC # or RLIN # Index

MARC Tag

Indicator

Subfields

001


all

Searching The Opac - Help Screens

Help Screens

When a user performs a search, the system responds with a help screen tailored to that type of search (e.g., a title search). The Title Search Help screen in the Web OPAC is shown below:

Searching The OPAC - Entering Search Statements

Capitalization

Search statements may be entered in uppercase, lowercase, or mixed case. The Web OPAC isn't sensitive to case, since it translates all search statements to lowercase before performing the search.

Punctuation

When processing search statements, the Web OPAC observes the following rules regarding punctuation:

  • The ampersand (&) is treated as if it were the word "and" spelled out

  • Apostrophes are removed

  • Most other punctuation marks are replaced by spaces for purposes of searching

  • INNOPAC treats repeated spaces or repeated punctuation marks (other than the ampersand and the apostrophe) as a single space, e.g., " --- " is treated as " ". Whether or not these punctuation marks are included has no effect on a search.

Examples of equivalent searches

All the King's Men

All the Kings Men


Fathers & Sons

Fathers and Sons


O'Malley, Walter

Omalley Walter


Mexico--history

Mexico history


U.S. News

U S News

U. S. News

NOTE

While the above three "U.S. News" entries are equivalent to each other, they are NOT equivalent to "US News" (since there is no space between the 'U' and 'S')


Diacritics and Special Characters

INNOPAC supports the full ALA character set even when searching is done using terminals and microcomputers which cannot display certain diacritics and special characters. On these terminals, searches for special characters may be done using substitute Roman characters which the library specifies. For example, a search for books about Spain, "España", will succeed if the user keys "Espana" (no diacritics or special characters) even though the system has stored the Spanish "ñ" in a representative form as set by the Library of Congress. The Web OPAC will display these characters, provided the client browser has been configured to do so.

Chinese Characters

INNOPAC searches for both the traditional form of a character and the simplified form, at the same time, when a user enters either form in the search statement. As is the case with ALA special characters, the Web OPAC will display them on browsers that are configured to do so.

Initial Articles

When filing MARC 21 (USMARC) entries, INNOPAC takes into account the MARC 21 format specifications concerning when to ignore initial articles in titles (i.e., the second indicator of the 245 field). Where the MARC 21 format is incomplete (e.g., for a subfield t of a 7xx field which begins with an English language article), INNOPAC will still file the entry correctly.

The library can specify the initial articles that INNOPAC should ignore in Web OPAC search statements for title searches, e.g., a, an, the, la, le, les, l', etc. Users performing searches may choose to input or not input articles which are included in the library's list; either way, INNOPAC will retrieve the same record(s). For example, if the is included in the list of articles to ignore, a user may input the title The New Yorker or New Yorker; in either case, the system will retrieve the correct record(s). If no records are found, the user will be offered an opportunity to browse in the appropriate alphabetical portion of the index, e.g., New, not The. If the library has included le in the list of initial articles to ignore, then a user may start a search statement with either Le Monde or Monde and INNOPAC will retrieve the correct record(s). If no records are found, INNOPAC will place the user in the Ms, not the Ls. Likewise, if l' is included in the list of articles to ignore, INNOPAC will search for age if l'age is the first word in the search statement.

SEARCH TIP

If you wish to retrieve titles beginning with a word which is normally considered to be an initial article (e.g., the title "A to Z, the Alphabet"), type the initial article twice when performing the search. For example, entering "A A TO Z, the Alphabet" will cause INNOPAC to search for the desired title.

If an article is not in the list of initial articles to ignore, INNOPAC will treat it as a word to search for. The person performing the search must determine whether the article should be included in the search, as in "Los Angeles", or should not be included in the search, e.g., "los lobos". Note, however, the system can retrieve records correctly for users who input initial articles not included in the library's list, if the cataloger makes an added entry (or a cross reference) for the heading using the initial article (i.e., the added entry has the indicator set to zero).

MRRL's list of ignored initial articles is:

an ,the ,el , la ,las ,lo ,los ,un ,una ,unas ,unos ,das ,le ,l' , and les


Searching The OPAC

INNOPAC records can be retrieved by searching in INNOPAC's web-based Web OPAC or by staff searches performed from within various INNOPAC functions. This "Overview" section discusses Web OPAC searches and staff searches, although the focus is on Web OPAC searches.

INNOPAC uses indexes when it performs searches (the library has a great deal of leeway in specifying which fields will be included in each index). The examples in this lesson are based on the indexing options that many libraries have chosen, however, it should be noted that indexing can differ from library to library.

The Web OPAC uses HTML links, buttons, and forms to guide patrons through the search options.

The menu structure and available options for the interface is quite flexible. The Web OPAC offers great flexibility in design of the interface.

NOTE

The Web OPAC menus are entirely under the control of the library and may be changed at any time by library staff.

In addition to offering various indexes for record retrieval in the OPAC, the library can also offer some or all of the following services to Web OPAC users (some of the following are products which the library must acquire separately):

  • Information about the library and its catalog (see Library Information).

  • Opportunity for patrons to enter suggestions and describe materials the library should acquire (see Library Information).

  • Information about items on reserve (see Reserve Lists).

  • The ability to connect to other databases or systems (on the same machine or different machines), such as journal citation databases or to other library systems using the Z39.50 protocol (see Reference Databases).

  • The ability to export records in a variety of formats, including, for libraries on the Internet, the capability to email the records (see Export Marked Records).

  • The ability for patrons to view their own records, renew materials they have already checked out, and to cancel their own holds (see Patrons View Their Own Circulation Records).

  • The ability to transfer a search to an INNOPAC system at another library with whom there is a co-operative agreement (see INNOPAC Partners).

  • The ability to restrict a search to a particular collection, such as the West branch, or music recordings (see Search Scoping).

  • Display of the table of contents for particular titles (see Tables of Contents).

The opening screen that patrons see in the Web OPAC might look similar to the following (the library has complete control of the layout and options on this screen; see Search Help Screens in the Web OPAC Management section):

Introduction to the WebPac

Welcome to the first of the Millennium training sessions! This training program will focus on the structure of the catalog so that we can all understand how to search for information more efficiently - and then pass that knowledge on to our patrons.

In this program, we'll be learning:
  • Searching The WebPac
  • Screen Displays
  • Indexes and Search Strategies
  • Printing and exporting records
  • Featured Lists
  • Viewing your own patron record
  • Library Information
  • Suggestions and Books To Acquire
    • Reading Patron Suggestions
  • What's New
    • Notable WebPacs from other libraries
Click on each title to go to that lesson. Be sure to post in your blog your thoughts and/or exercise results for each of the lessons you have finished!