Showing posts with label word processing. Show all posts

Wednesday, July 18, 2007

Lesson 3a: Basic Skills - New Documents

Creating a New Document

The basic function of a Word Processor is to create a blank sheet of virtual paper for you to use to create documents. All 3 of the word processors we will be looking at do this in similar ways.

Google - From the main screen of the Google Docs & Spreadsheets application, you can click on the "New" menu to choose whether to create a new Document, Spreadsheet, or Folder.

The new document will open in a new browser window (or tab, depending on your browser preferences) and will be ready for you to start using immediately. A fairly new feature of the Google Docs & Spreadsheets application is the ability to create folders for your documents. Google has always allowed tagging and starring documents, but now you can both tag and file them into folders, just like you would on your personal computer.

You can also organize your documents and spreadsheets several different ways - those created by you, those that are starred for importance, items in folders, items by type and those that are shared with others.


Word - There are several ways to create a new document in Word. The easiest is to click on the new document icon (the black sheet of paper on the toolbar), but the most flexible is to go to the menu bar, click on the "File" menu and choose the "New" menu option.
This brings up the new file sidebar to the right of your screen. From here you can create a blank document, documents in other formats (XML, HTML, etc) and documents from templates, something that Google can't do right now.


Open Office -

To create a new document in Open Office, the procedure is nearly identical to the way you will do it in Word, but without the sidebar. Instead, the new document options appear as a fly-out menu when you hover over the "New" menu item. Again, you can create several documents in different formats, but with OO you can also create new spreadsheets, presentations, drawings or databases from this application as well.

Lesson 2c: Word Processing Basics - Interface part 3

Now that you are familiar with the way Google Docs does the basic tasks of Word Processing (set fonts, set formatting, save/print documents, etc.), we'll go over the way to do those things in both Microsoft Word and in Open Office.

MS Word 2003


Word's interface (from the 2003 version, the 2007 version will look quite a bit different) is the standard among desktop word processing programs. Most will look something like what you see in the image above. You will notice that there are quite a few more options available via the desktop word processors than there are via the online applications - but most people don't ever use 90% of the features a program like MS Word offers.
The basics are the same. There is a file menu, which allows you to open, save (in multiple formats) and print your documents. There is an Edit menu which contains the copy/cut/paste commands and the find/replace commands that are on the File menu in Google Docs. The View menu gives you multiple ways to view your documents and has no equivalent in Google Docs. The Insert menu is similar to Google's Insert menu, though. You can insert pictures, comments, symbols and many other items - up to and including whole documents - via this menu. The Format menu contains the features that Google puts in its Edit menu (font and paragraph controls, plus more). The rest of the menu items (Tools, Table, Window & Help) offer other options that can - for the most part - be found in File and Edit menus on Google Docs.
The toolbars below the menu bar contain graphical representations of the most commonly used features (as of Word 2003 - your most commonly used features) from the menu bar. Every feature available in Word is in the menu bar, the most common ones, though, are also represented in the toolbars below.


Open Office 2.2


As you can see, Open Office has the same menubar that Word has, and each menu item does essentially the same things. The toolbars below the menu items are just slightly different - some of the icons look a bit different than the ones in the Word toolbars, but they do the exact same things.

Wednesday, June 20, 2007

Lesson 2b - Word Processing Basics - Interface part 2

Edit toolbar


This is the first toolbar in the Google Doc's interface. Here is where you will find most of the tools that you need to create documents and format them.
Starting at the left:
  • undo - undoes the last action taken
  • redo - redoes the last action that was undone
  • cut - cuts out selected area of the document
  • copy - makes a copy of the selected area of a document
  • paste - pastes cut or copied areas of the document where the cursor is located
  • bold/italic/underline - bolds, italicizes or underlines the selected text
  • font - chooses the font face (the way the text "looks" - limited selection because of the web-based nature of the application, only fonts that will be on every computer are included)
  • text size/text color - choose the size/color of the selected text or the next text that you type in, if no text is selected
  • text highlight - put yellow "highlighting" on selected text
  • link - make selected text a link, opens a wizard to get URL of the link
  • numbered/bulleted list - creates an autonumbering or bulleted list
  • indent less/more - bring selected indented text back to the left, send selected text to the right
  • quotes - formats selected text as a quote, indenting both margins and adding a border
  • align left/center/right - aligns selected text to the left
  • margin, center or right margin
  • remove formatting - removes any previous formatting options (bolding, text color, indenting, etc) from selected text
The Style drop down box includes ways to add headers to your document (3 levels deep), justify align text (so that the text stretches between the right and left margins without any ragged edges) and set text direction, page spacing and text formatting "extras" such as striking out text or super and subscripting text.


The Change drop down box helps to restore original formatting by restoring or removing extra blank lines in your document and helps you manage bookmarks (hortcuts to specific places within the document itself - you might use them when creating an index or Table of Contents)

Insert Toolbar


This toolbar allows you to insert Images, Links, Comments, Tables, Bookmarks (see above for explanation), Separators (either just a horizontal line or a full page break) and Special Characters that you cannot type on your keyboard (such as the cents sign).

Revisions Toolbar

The revisions toolbar lets you use the revision features of Google Docs to compare previous versions of your document to a current one. This is a powerful feature for a collaborative document! If you aren't sure where your collaborator made their changes, you can see them quickly by viewing the revision history - contributions from each author are in a different color!

Reading
Your reading for this lesson will give you some more information on Google's revision features as well as some "advanced" features available in Google's Docs application. Enjoy!

Tuesday, March 27, 2007

Lesson 2 - Word Processing Basics - Interface part 1

Google Docs' Interface
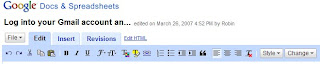
Above, you see the left side of the Google Docs screen. The top black text (here it says "Log into your Gmail account an...") is the title of your document. If you save without changing the title, it will take the first text in your document and make it the title. Until you save, the text will simply say "Untitled". Click once on that text to change the title to whatever you would like.
Below the title is the menu bar. It begins with the "File" button.
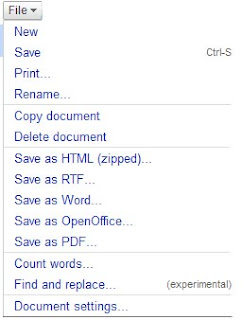
You can create a new document from this menu, as well as save the document you are working on, print the document you are working on or rename it. Notice the "Ctrl-S" beside the "Save" command. This is a standard word processing keyboard shortcut to save a document and it works in Google Docs. Many keyboard shortcuts that you may use in offline word processors won't work, though, so you may want to check the right side of the menus to see what is available.
Below the file commands are two other commands - copy and delete the document. These do just what they say - make a copy of the document as a separate file in your Google Docs application and delete the document from Google Docs altogether.
The next part of the menu allows you to save the document in several different formats. Each of these formats was defined in the first lesson, so please refer back there if you are unsure of what a particular format acronym is. Most offline word processors don't have the ability to save their documents in such a wide range of formats!
Next is the "count words" feature. This is a standard feature on offline word processors as well. It allows you to keep track of the number of words in your document, a common need for students and authors who need to produce documents of a particular length. Find and Replace is also there, but it is still under development, so it may or may not work as expected. Remember that Google Docs is in Beta (still in development) and some things may not work as expected. Make use of those saving options and save your important documents offline frequently!
Finally, the document settings option gives you a way to change the "standard" look of your document. It defines the default font, font size and line spacing for all of your new documents. You can, of course, change these as needed for each individual document, but this is the way to make global changes to all new documents you create if you really hate the font, font size or line spacing that Google Docs makes as the default.
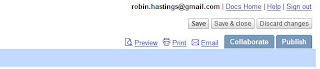
The next part of the interface is on the right side of your screen. This provides you, from right to left and top to bottom, with the user name/email address you are logged in with, links to the list of documents you have in your "Docs Home", a link to get help and a link to sign out of the application. The buttons below those links offer you easy ways to save the document, save it and close it (all in one button push) and close it without saving it (Discard Changes). Below that are links to preview the document, print the document, email the document or share it.
Collaborate offers you the chance to work with someone else on a document. You can enter the email address of the person you want to work with (at the moment, only Gmail addresses seem to work properly) and give them collaboration rights to the document. This means that you both can edit the document without having to email it back and forth or worry about which version you are working on - you both have the most recent version all the time! We'll get more into Collaboration later.
Publish allows you to give that document a unique address on the web (it's very own URL) and give that address out to anyone who may want to read your document. This does not give out editing rights - just reading!
The next lesson will go into the tool bar and the various things you can do with it. Until then, your assignment is to read the linked articles below to get an overview of Google Docs.

Reading:

Monday, February 26, 2007

Lesson 1 - What is a word processor?

Just to start at the beginning, a basic definition for a word processor is a software application that assists you in creating, formatting and editing text documents. These applications range from high-end, business-class systems like Microsoft Word to bare-bones web-based applications like Google Docs. All of them let you create text and make it pretty, and they all have basically the same features - they just put them in different places. We'll be learning the basics of word processing - the stuff that you can do in Google Docs - not the basics of a particular word processing program.
Other basic definitions you should know before you use any word processor:
  • font
    • Similar to a typeface, a font is a set of letters, numbers, and punctuation marks.
      Different fonts have different visual styles and characteristics.
  • formatting
    • Changing the appearance of a document, for example, making text bold or
      changing its placement on the page.
  • justification (or alignment)
    • The way text is placed on the page - right justified (or aligned), left justified (or aligned) or centered
  • File Formats (HTML, RTF, PDF, DOC, ODT)
    • HTML - Hypertext Markup Language, a language used to code a document so that it is viewable with a browser on the web
    • RTF - Rich Text Format, a format that is universal among word processors - any word processor (Word, Wordperfect, OpenOffice, etc.) will be able to display a document saved as .rtf
    • PDF - Portable Document Format, a format that is readable by anyone with the free Adobe Acrobat reader (most computers come with this software already installed) - it is not editable without special (usually expensive) software, but it can be read - with perfect formatting - by anyone
    • DOC - Word Document Format, used by MS Word, only editable (without massive loss of formatting) by Word
    • ODT - Open Document Format, used by OpenOffice, it is an open format that any word processor maker can use. Not in use by many other word processors yet.
  • wizard
    • A helpful tool that guides you through a task step by step. Usually only available in offline word processors like MS Word, Wordperfect and OpenOffice. Not available in online word processors like Google Docs.
  • template
    • A document used as a pattern for other documents. Available mostly in offline word processors, though some workarounds exist for online word processors.
Directions: Getting into Google Docs:
  1. Log into your Gmail account
  2. Check the top left corner - see if there is a link to Google Docs & Spreadsheets. If there is, click it
  3. If there isn't, click on "My Services", then click on the Google Docs & Spreasheets link at the right.
  4. Click on "New Document"
  5. Click on the "Untitled" title of the document to change it
  6. Start typing.

Exercise
: Log into your Gmail account and go to Google Docs & Spreadsheets. Start a new document and type in a sentence or two (feel free to copy and paste these sentences if you don't feel like coming up with something yourself). Change the font of each sentence using the Font drop-down menu. Note the fonts that are available.
Next, go into Microsoft Word and do the same thing. Note the fonts that are available in MS Word, as opposed to Google Docs.

Word Processing Skills

Welcome to the Word Processing skills lesson! We aren't going to focus on a particular application, though screen shots and the like will probably be from Google Docs & Spreadsheets, so the lessons you learn here will be applicable to any word processing program you find yourself using.

Syllabus:
  • Word processing basics - terms and concepts
  • Basic interfaces
    • Google Docs in depth
    • Word/Open Office
  • Basic Skills
    • Create a new document
    • Edit a document
      • Select, copy/cut/paste, line spacing, lists, insert pictures/clip art, spell check
    • Print a document
    • Save a document
    • Navigate the file system/storage system to find and open a document
  • Specific Skills
    • Publish/Share a Google Doc
    • Blog a Google Doc
    • Use Templates in Word/Open Office
    • Fake Templates in Google Docs
  • Google Docs features and future plans